[Support Guide] How can I receive emails on my domain?

Last reviewed by Netlify Support: March 2022

That’s a really common question! Netlify does not provide email service. But no worries! You can choose a service yourself, and then set up the DNS records required by that email provider at Netlify. Note that these instructions are primarily for folks who are using Netlify’s DNS Hosting.

Any mail provider should work with our DNS hosting, from major ones like GSuite and Outlook to your own mail server. Some specific services customers have reported working well that are cheap or free are:

  • Zoho mail has a very cheap plan for “full” email service.
  • You can also consider a email forwarding service like ImprovMX, which is free forever, but somewhat more limited in functionality.

Once you have selected your service, you can then follow the directions below to add your MX (mail) records to your Netlify DNS zone if you are using Netlify to manage your DNS . Otherwise, you’ll do this following the instructions provided by DNS hosting provider, in their dashboard. In many cases, if you have not configured DNS, specifically, this will be your domain registrar.

  1. In the Admin UI for your site, go to Domains - Production domains and click the NETLIFY DNS link to the right of your production domain to access the DNS panel for that domain. You can also get to the page to add the record via Account Name > Domains > “Name of the domain”.

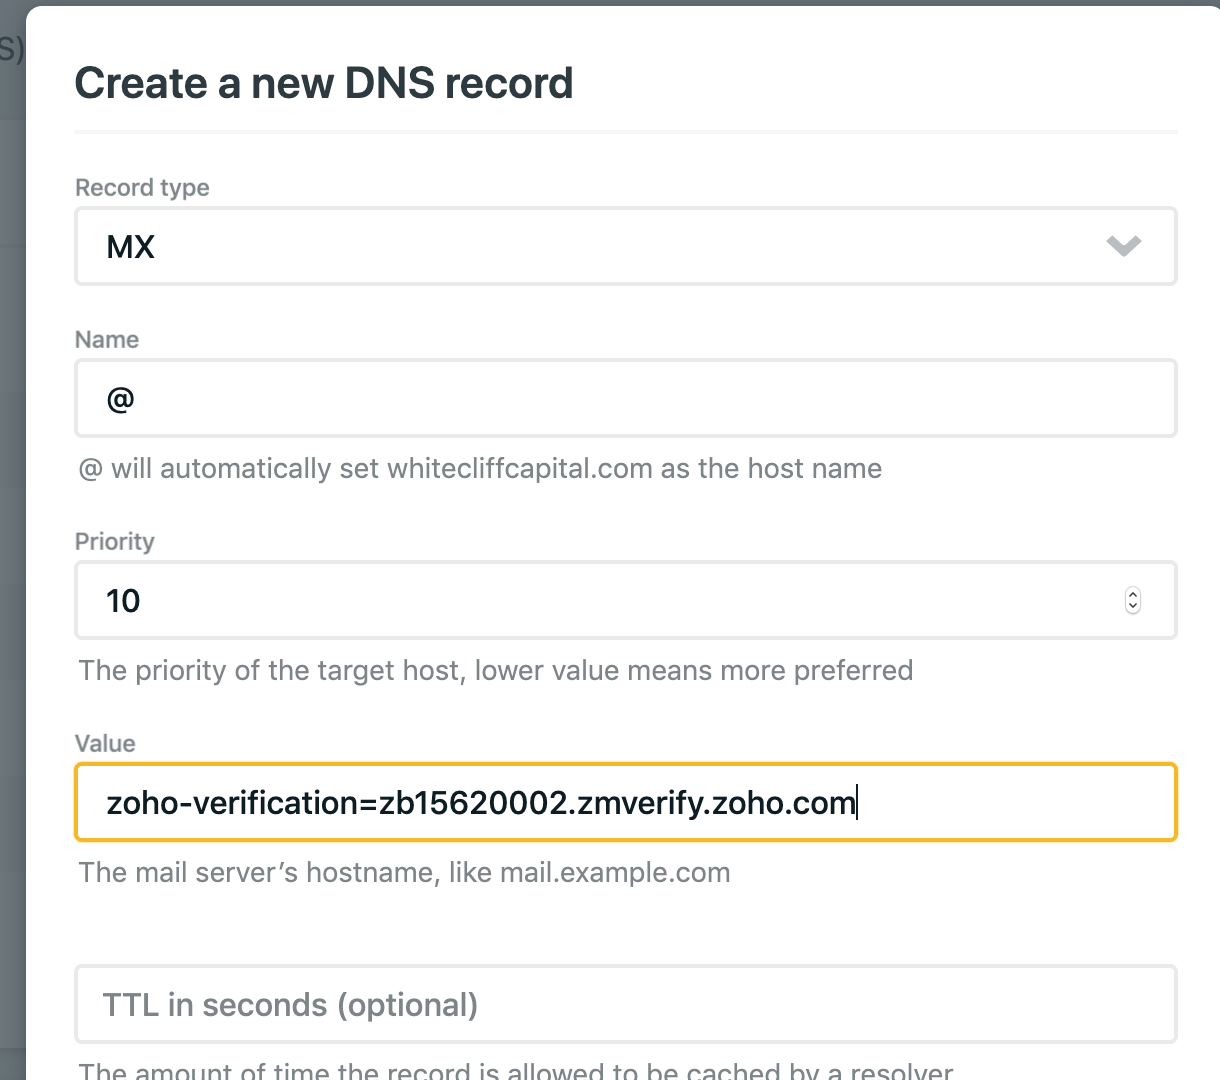
  2. Click the Add new record button and enter the settings below:

The settings for each record are as follows:

  • Record type - select MX.
  • Name - just the @ symbol, nothing else needed. This will default to the name of your Netlify site name.
  • Priority - an integer; lower numbers are higher priority. Set it to whatever your email service recommends -which is often different for each of several records you should add!
  • Value - this will be the server path provided by your email service. Do not include http:// or https://. For example, for GSuite, you can find the settings here.
  • TTL (Time To Live) - this will default to 3600 seconds and the default is usually appropriate.

Click the Save button and wait for the settings to propagate (wait time will vary, based on the TTL of your OLD settings. Typically 15 minutes to 1 hour.).

Most email services now use at least one of three “sub-types” of TXT type records for security and verification. Those sub-types are: SPF, DKIM, and DMARC.

There can also be other records required as well (besides SPF, DKIM, and DMARC).

Please consult the documentation for the email service to find out which DNS records it requires. Your email service’s documentation will be the best place to find this information. Once you know what the required records are, be sure to add all of them to Netlify DNS.

Once all your records are saved your email should now be working!

If it doesn’t work, or you have further questions, let us know below. (Please include the name of the email service you are using and a link to the instructions you are following to start.)

Additionally, for further information on Netlify DNS, such as migrating a domain with zero downtime, how to set up DNS, or how to detect and fix inactive Netlify DNS zones, check out our Support Guides!

24 Likes

I have tried Zoro mail, but always not authorized by netlify. I may need some help.

hi there, can you give us some more information about what you mean by “not authorized?” do you have an error log or a screenshot you can share? We need a little more information before we can debug :slight_smile:

Here are 3 photos that I took from different mail service panels that I want to use. Could you tell me if I have something wrong. Thanks


2nd photo


3rd photo, thanks

I’m not sure what the correct rule the email service expect is. Each service will have its own requirements and I’m not familiar with this email service provider’s verification process.

It appears (from the screenshots) to be wanting an MX type record with mx.ym.163.com for the value (but I would also expect an integer priority as well, but I don’t see this included).

If that is true, I would expect the DNS records in the third screenshot to meet that requirement (but again, this could be because the requirement itself isn’t clear to me).

Also, when I currently check, I see the a different set of MX records for this domain:

$ dig coletcoffeemachine.com MX +noall +answer

; <<>> DiG 9.10.6 <<>> coletcoffeemachine.com MX +noall +answer
;; global options: +cmd
coletcoffeemachine.com.	299	IN	MX	50 mx3.zoho.com.
coletcoffeemachine.com.	299	IN	MX	20 mx2.zoho.com.
coletcoffeemachine.com.	299	IN	MX	10 mx.zoho.com.

These are not the record being shown above in the MX record screenshot. This could be because you no longer require those settings (if I am guessing a reason for the change).

If you have other question about this, please let us know.

1 Like

I followed the instruction from the OP, after signing up for Zoho, everything seems to pretty straight forward, however, I am unable to verify my domain with Zoho, using the TXT method or the CNAME method. and logging into the domain section of Netlify, I am unable to input the value. Please advise Attached are the photos.

2 Likes

When I enter the value, it’s telling me to change the format, not clear on what this means exactly.

Thank you for your assistance :slight_smile:

Hi @john,

I think you’ve already changed that to a TXT record, is everything working now?

@ Laura, yes everything is working now, thank you for suggesting Zoho, when I initially had to create a new record, I had to either choose CNAME or TXT, later in the process, I would select the MX record. thanks

2 Likes

Dear @Laura,
Thank you for all that you do. I’ve read your posts up here and am very grateful for the information you provide.

Would you know whether I should create separate zoho accounts for every team member joe@myClientsSite.com , suzie@myClientsSite.com, support@myClientsSite.com and so on?

I am also planning to change DNS registration from godaddy :roll_eyes:to netlify. Should I do this step first and then set up emails? --what would you recommend?

Many thanks!

Mailgun is a good option too, their free tier includes 10k emails a month. Though their docs aren’t the clearest, they suggest using mg.domain.tld as the domain when you should just use domain.tld, and the host they give you for the records often needs to have the domain removed from it. Otherwise it’s awesome!

2 Likes

Hi @rpw!!

You can set up your Zoho in whatever way makes sense for your needs. Just make sure you check to see if Zoho charges for more than one email address. I only use it for my team of one, so I don’t know what their pricing structure looks like for more than that. And it makes sense to set up your DNS first, then set up emails so you don’t have to do that twice.

The Mailgun suggestion from @n-ham sounds intriguing and worth checking out as well!

1 Like

:frowning:
…So it looks like one adds users and gets charged $12.00 for every new user. --We’re locked in to the service. But I can’t complain. It works rather nicely. :+1:t3:

Good to know! Thanks for sharing that.

Following this rules, my e-mail is running and ready to work!
Thank you @laura!

2 Likes

I made the following configuration:
image 1
Based on this post directions. But then I would send emails from my domain, @hsteel.eng.br, I would receive from the same domains. But when I send emails from other domains this error would occur:

503 5.0.3 <mail-wm1-f42.google.com[209.85.128.42]>: Client host rejected: Para envio de mensagens e necessaria autenticacao. Para saber como corrigir este erro acesse: http://wiki.locaweb.com/pt-br/Email_Locaweb_-_Envio_Autenticado /This mail server requires authentication

Final-Recipient: rfc822; suprimentos@hsteel.eng.br
Action: failed
Status: 5.0.3
Remote-MTA: dns; mail.ita.locaweb.com.br. (191.252.112.194, the server for the
domain hsteel.eng.br.)
Diagnostic-Code: smtp; 503 5.0.3 <mail-wm1-f42.google.com[209.85.128.42]>: Client host rejected: Para envio de mensagens e necessaria autenticacao. Para saber como corrigir este erro acesse: http://wiki.locaweb.com/pt-br/Email_Locaweb_-_Envio_Autenticado /This mail server requires authentication
Last-Attempt-Date: Tue, 07 Apr 2020 05:24:02 -0700 (PDT)

My email provider, provided the following chart for configuration.

What did I do wrong?

DNS for the MX records looks correct:

$ host hsteel.eng.br
hsteel.eng.br mail is handled by 10 mx.a.locaweb.com.br.
hsteel.eng.br mail is handled by 10 mx.b.locaweb.com.br.
hsteel.eng.br mail is handled by 20 mx.jk.locaweb.com.br.
hsteel.eng.br mail is handled by 20 mx.core.locaweb.com.br.

I think that due to the error message:

Para envio de mensagens e necessaria autenticacao. Para saber como corrigir este erro acesse: http://wiki.locaweb.com/pt-br/Email_Locaweb_-_Envio_Autenticado /This mail server requires authentication

…perhaps you are missing some SPF or other mail records or settings, around permissions and authentication on their servers, that they can tell you about? It looks to me like their mailserver got the mail, and rejected it because the email was wrongly sent (rather than sent to the wrong host) - which is not having anything to do with Netlify’s service.